Start VMD
Load a trajectory (e.g. sample.psf and sample-traj.dcd)
Select Extensions:Analysis:Timeline from "VMD Main" window.
Calculate and display graphs:
To display a 2D graph of secondary structure vs. time, select
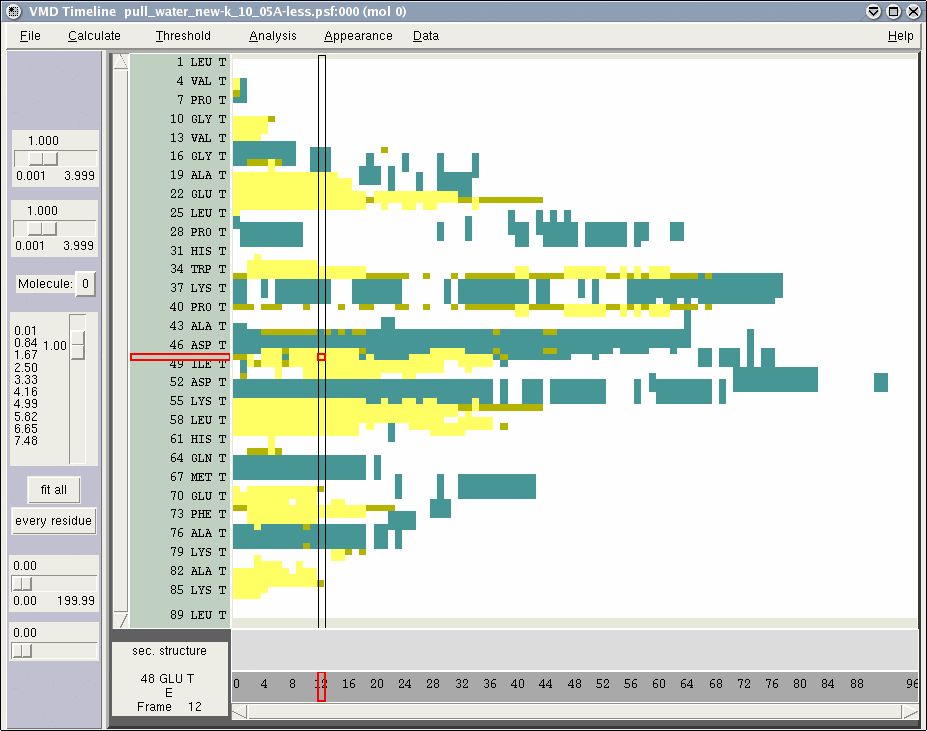
Calculate:Calc Sec. Struct. from the "VMD Timeline" window. A color-coded map
of secondary structure should appear. The horizontal axis is time (frame
number), the vertical axis is residue number/chain.
To change red-highlighted residue (or selection group): Click on the Timeline graph with the middle mouse button, or hold down the middle mouse button and scrub up and down. A red outline highlight will be drawn at the selected residue in the graph. The red box shows current residue (selection) and frame.
View data about red-highlighted residue (or selection group)
group: As you click with middle button, the description panel shows
corresponding: frame number, analysis value, name of analysis method, residue
number and chain (for residues), selection label (for selection group).
Graph zooming:
Control the residue numbering as for the Sequence Viewer [link to section].
The top left horizontal slider sets the scale for both axes simultaneously.
The left horizontal slider below it sets the scale only for the horizontal
axis. The vertical slider sets the scale for the vertical axis. "Fit all" will fit both the vertical and horizontal graphs into the
window. "Every residue" will scale the vertical axis so there is sufficient room to label every residue (or every selection group) in the molecule.
Use the right mouse button to drag out a green selection box to define a zoom-in region. Click with the right mouse button (without dragging) to zoom out.
To change highlighted frame: Click on the Timeline graph with the middle mouse button, or hold down the middle mouse button while scrubbing left and right over the graph, to change the frame displayed in the GL window. A block outline will overlay the current time in the graph. The red highlight box shows current residue (selection) and frame. The frame will change as the mouse is scrubbed around the Timeline data graph.
To change red-highlighted residue (or selection group)
Click on the Timeline graph with the middle mouse button, or hold down the
middle mouse button and scrub up and down, to change the red-highlighted residue
(selection group) in the Timeline window, as well as the highlighted residue
(selection group) in the Open GL window. A red-highlight outline will be drawn
at that frame/residue position in the Timeline graph. The red box shows current
residue (selection) and frame. The corresponding residue will be highlighted
in the Open GL molecule view, even as the mouse is scrubbed around the data
graph.
Use threshold graph: view a graph over time of the number of elements at each frame meeting threshold criteria. For numerical values, the bottom two sliders in the left Timeline panel control the minimum and maximum threshold bounds for producing the threshold graph; the threshold graph updates dynamically as the sliders move. The graph size is normalized to the largest count seen for any frame.
- To highlight residues for entire trajectory: left mouse button click, shift-click, and click-drag in the vertical axis labels (left of the main data graph) work as in the "Sequence Viewer" plugin to select residues or selection groups for highlighting.
To highlight an 'event': Click and drag a marquee box with the left mouse
button. A blue box will appear in the graph to show the residues and time
range selected. Shift-Click-drag out another box to select more residues;
several sets of residues may be selected, but only one frame range. The
trajectory will animate through the selected frame range three times after each
selection.
The selected residues will appear as bonds; change their color and draw style
by changing the associated representation in the "Graphical Representations"
window.
To clear blue 'event' highlight box: click twice with middle mouse button.
Other per-residue calculations are available besides secondary structure.
From the "VMD Timeline" window menu:
Calculate:Calc X position : simple per-reside information
Calculate:Calc Y position : simple per-reside information
Calculate:Calc Z position : simple per-reside information
Calculate:Calc. Phi: per-residue Phi angle
Calculate:Calc. Psi: per-residue Phi angle
Calculate:Calc. Delta Phi: per-reside change in Psi angle from initial frame
Calculate:Calc. Delta Psi: per-residue change in Psi angle from initial frame
Calculate:Calc. displacement: per-res displacement from initial frame
Calculate:Calc. disp. velocity: per-res inter-frame displacement (crude velocity analog)
Calculate:Calc H-bonds: show hydrogen bond lifetimes through trajectory. Finds all hydrogen bonds that appear throughout trajectory, value is 1 in frames the bond is defined, 0 when the bond is not defined (VMD default criteria)
Calculate:Calc Salt Bridges: show salt-bridge lifetimes through trajectory. Finds all salt bridges that appear throughout trajectory, value is 1 in frames the salt bridge is defined, 0 when it is not (VMD default criteria)
Calculate:Calc. User-def. per-res. function: run a simple user-defined functions on every residue (or selection group) displayed
Make a user-defined per-residue procedure:
Insert the name of a user-defined tcl procedure which will be run on every residue, perpend "::" to indicate the user-level namespace. The named tcl procedure will be provided with 3 VMD selections to work with: resCompleteSel (the current residue or selection group), resAtomSel (a single atom for each protein or nucleic residue), and proteinNucSel ("protein or nucleic" VMD selection for the whole molecule).
Example 1:
  proc ::myResX {resAtomSel  resCompleteSel  proteinNucSel} {
    return [$resAtomSel get x]
  }
Example 2:
  proc  ::myCountContacts {resAtomSel  resCompleteSel  proteinNucSel} {
    return [llength [lindex [measure contacts 4.0 $resCompleteSel $proteinNucSel] 0]]
  }
Save currently-displayed data to a .tml file
File: Save Data file: saves the current per-res or per-selection-group data for entire trajectory
Load data from an existing .tml file
File: Load Data file: saves currently-displayed per-res or pre-selection-group data for later use.
Data is read/written to a .tml file.
View collection of pre-generated .tml files: select Data:Set collection directory... to point to a directory filled with .tml files corresponding to the currently loaded molecule.
The Data menu will then populate with the names of the datasets, one per .tml file in that directory. Select each dataset name to display on the Timeline graph, just as in the Calculate menu.