VMD Movie Plugin, Version 1.8
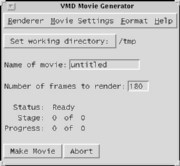
| This plugin provides a complete solution for creating several simple rotation and trajectory movies for presentations and science discussions. The plugin automatically handles everything from initial rendering of the movie frames, conversion of the image file formats, image smoothing, image rescaling, text labelling, and final compression and encoding of the images as an Animated GIF, AVI, MPEG, or Quicktime movie. |
|
|
Software Requirements:
The movie plugin relies heavily on several platform-dependent programs which provide VMD with a means of generating the final movie files. The features provided by the movie plugin vary by platform, according to the mechanism used in generating the movies.
Microsoft Windows
- POV-Ray 3.6 requires that you check the "No restrictions" for reading writing files option, and disable the "single instance" option in the POV-Ray graphical interface so that VMD can execute POV-Ray automatically.
- On Windows, the program VideoMach is currently required for all movie generation tasks. It is a shareware program and is available for trial download from the VideoMach web site. Licenses are $20 or $60 depending on the number of video/image formats you want to use it for. The $20 license is sufficent for VMD.
- Looking for other movie converters! We are looking for free movie converter packages which can be run on Windows in batch mode as is currently possible with VideoMach. If you know of free movie compression programs that work well on Windows, please email vmd@ks.uiuc.edu and let us know so we can add support for them in future versions of the movie maker plugin.
MacOS X
- Install the Fink package manager on your MacOS X machine.
- Run 'fink install netpbm' to get the NetPBM toolkit required by the movie plugin.
- Run 'fink install imagemagick-nox' to get ImageMagick, required to create animated GIF movies
- When rendering or writing temporary files outside your home directory POV-Ray 3.6 requires that you edit ~/povray.conf and add lines such as "read+write /working/directory" in order to be allowed to run POV-Ray and generate files outside your home directory. You need one "read+write" line for every directory tree you want to be able to use.
Unix platforms
- The NetPBM utilities are used to convert between image file formats such as Targa, PPM, BMP, etc. NetPBM can be downloaded from the NetPBM home page. The "ppmtompeg" program included with NetPBM is what is used for MPEG-1 encoding currently.
- The ImageMagick utilities are used (specifically, the "convert" program) to provide the animated GIF output format. ImageMagick is available from the ImageMagick web site.
- The SGI "dmconvert" tool is optionally used to provide conversions to the MPEG, QuickTime, and SGI Movie formats. This option is only available on the IRIX platforms.
- When rendering or writing temporary files outside your home directory POV-Ray 3.6 requires that you edit ~/povray.conf and add lines such as "read+write /working/directory" in order to be allowed to run POV-Ray and generate files outside your home directory. You need one "read+write" line for every directory tree you want to be able to use.
Feature-specific notes:
The text below provides a few simple suggestions to get best results with specific movie making settings, and workarounds for common problems.
Rendering using "Snapshot":
Some Windows and Linux OpenGL video drivers behave erratically with
the "snapshot" rendering mode, so it may be necessary to use one of
the ray tracers if you have a video driver that gives "garbled" images
when you use the "snapshot" rendering mode.
Rendering using "Internal Tachyon" or "Tachyon":
Since Tachyon is packaged with VMD itself and has been developed
side-by-side with the rendering features in VMD, it is the best choice
for high quality ray tracing of VMD scenes. Tachyon is best used for
rendering movies that use ambient occlusion lighting, angle-modulated
transparency, gradient backgrounds, and other features that are
closely tied to specific VMD rendering capabilities not supported
by other rendering packages. On versions of VMD that include support
for the "Internal Tachyon" option, this option is the best choice as
it avoids writing large scene files to disk and instead renders the
VMD scene directly from RAM, saving many gigabytes of disk space
and speeding up movie rendering considerably, particularly on fast
multi-core CPUs.
"User Defined" movie type:
Those individuals wanting to create complex movies beyond the
simple built-in movie types will want to use the "user-defined"
movie type. This movie type depends on a user-provided procedure
to perform the appropriate view and trajectory frame updates when
each movie frame is rendered. The user-defined procedure is triggered
when a special variable is set during the rendering process, by virtue
of the Tcl "trace" feature. The user-defined procedure must be enabled
to trace the ::MovieMaker::userframe variable before the movie generation
process has started. A simple example implementation using 3 procedures
is included below. In actual use, one would source the example script
below, then issue the enablemoviecallback routine, set the movie
type to "User Defined Procedure", and start the movie generation process
by pressing the "Make Movie" button. The user-defined movie frame procedure
can be disabled with the example disablemoviecallback procedure.
Simplest version of a user-defined movie script.
A more complete example that includes a fade-in on a transparent material. Follow the instructions at the top of the script to try it out.
"Userani" movie system:
Based on the trace method mentioned above, an easy-to-use automatic
animation system
Userani
for the Movie Maker has been
created, using a simple storyboard fashion. It offers an easy way to define
a timeline of the loaded trajectory, to which various animation procedures
can be added, as well as any VMD Tcl commands. This arrangement of the
timeline can also be visualized and unlimited parallel or overlapping
actions are available. There's no need to care about traces, frames and
frame ranges and a lot of animations are already prepared, including:
- Animated Auto-Zoom
- Animated Auto-Center
- Material Transparency Fading
- Material Property Fading
- Rotations real and graphically
Software antialiasing post-processing:
The use of antialiasing can greatly improve the quality of the final
movie as it will reduce artifacts that generally decrease the effectiveness
of the back-end compression algorithms in MPEG, AVI and other movie formats.
To use software-based post processing on machines or renderers that lack
built-in antialising, check the "smoothing" button, then enable the
half-size rescale button and make your VMD window twice the size
(on both axes) that you want the final movie to be. Once this
is done, you may render the movie.