next up previous contents
Next: Homology model Up: Rosetta/MDFF Tutorial Previous: Modeling amino acid insertions   Contents

Subsections


Model fit to mid-resolution EM density

To refine the completed model, we are going to perform an interactive MDFF simulation of the overall protein structure. Afterwards, we will analyze the outcoming structure for quality of fit to the EM density and refine it if possible.

MDFF run

For the iMDFF run, we will use the QwikMD interface as before.
1
Merging the final structures for input:
Open the final structures from the MDFF runs in section 3.1 and 4 in a text editor and merge the refined segments of the protein into a single PDB file.
2
Performing an interactive MDFF run:
Follow the steps explained in section 3.2.

Cross correlation coloring

Now, we are going to take advantage of the implemented analysis tool for Cross correlations (CC): The quality of fit of an atomic model to an EM density is evaluated by calculating the "overlap" with the density. The higher the cross correlation value is, the better the quality of fit is. Thus, we will check the quality of fit of our models by cross correlation coloring. The result will be visualized with VMD.
1
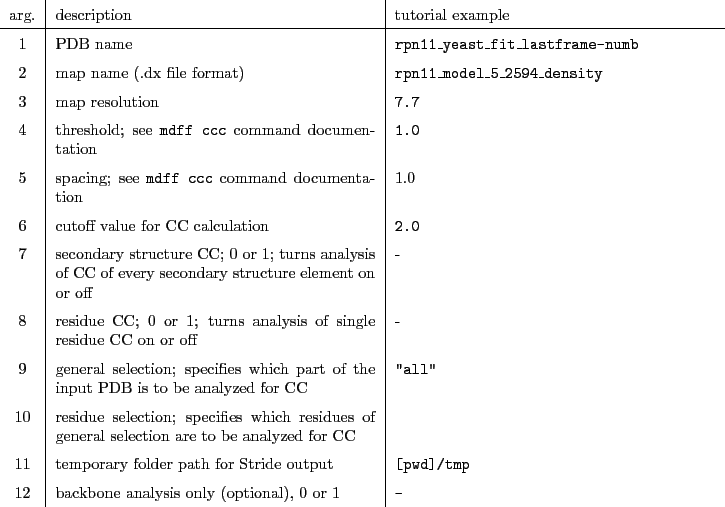
Preparing the configuration file Create a folder called cccolor in your workspace and copy the last frame PDB of the previous MDFF run to it as well as the density file rpn11_model_5_2594_density.dx that the MDFF run was performed with. Additionally, create a folder called tmp in the cccolor folder. Copy the script color_rpn11_cc.tcl to this folder and make the following changes in the script: The following script lines will load the colored structures and set the coloring mode to Beta, as the CC values have been stored in the beta columns of the produced PDB files. Thus, execute the color_rpn11_cc.tcl in VMD:

vmd -e color_rpn11_cc.tcl

and check the structures in VMD for red sections, which indicate a low CC value.


Table 5: Cross correlation coloring command arguments
\begin{table}\centering
\begin{tabularx}{16cm}{c\vert X\vert X}
arg.& descript...
...ackbone analysis only (optional), 0 or 1 & \tt - \\
\end{tabularx} \end{table}


Mid-resolution refinement

We will use ModelMaker to refine the segments that have a low cross correlation to the mid-resolution EM density. The executed command will run Rosetta with the CartesianSampler mover, refolding the selected segments by scoring the outcome with the given density. Furthermore, a relax step scored by the quality of fit to density is run. Additionally, a short MDFF run will be performed.

1
Preparing the configuration file Create a new folder called midres_refinement and put a new directory full_length_model in it, which you copy the last frame PDB from the previous MDFF run to. Rename this PDB file to rpn11_yeast.pdb. Copy the configuration file template refine_rpn11_midres.tcl from the corresponding tutorial directory to your working directory and adapt the paths as explained before (Tab. 1). Furthermore, copy the density file rpn11_model_5_2594_density.dx to the folder. The following lines configure our refinement protocol run:

  • line 27 and 28:
    define the variables nstruct and bestN, which will be used for the number of decoys to generate and the best $N$ structures to output, respectively.
  • line 29: set ch_seg [list "rpn11" "A" "AP1"]
    sets a list for the chains and segments for PSF generation. In this case, we have one protein chain that we name "rpn11", the PDB chain identifier is "A" and the segname is AP1.
  • line 36: make_mrc_file rpn11_model_5_2594_density
    creates an .mrc file from the given .dx file for Rosetta.
  • line 38: start_rosetta_refine ...
    starts the Rosetta refinement run. The single arguments are explained in Tab. 6. The whole line should look like

    start_rosetta_refine rpn11_midres_bb rpn11_yeast [list "resid 212 to 228" "resid 296 to 306"] 1 1 rpn11_model_5_2594_density 7.7 -0.3 $bestN $nstruct

    which refines the amino acids 212 to 228 and 296 to 306 from our input structure to the density.
  • line 39: start_mdff_run ...
    We can now automatically pass the resulting Rosetta decoys to MDFF. Therefore, the job name for the MDFF run ought to be the same as for the corresponding Rosetta run, as well as the input PDB name. The whole line should look like

    start_mdff_run rpn11_midres_bb rpn11_yeast rpn11_model_5_2594_density "not (resid 212 to 228 or resid 296 to 306)" 0.6 400 20000 7.7 $bestN

    and the individual arguments are explained in Tab. 7

2
Running the refinement in VMD Run the following command:

vmd -dispdev text -e refine_rpn11_midres.tcl

If no errors occur, you can find the final results in the MDFF output folder, including RMSD and CC plots. The last frame of the MDFF run has also been written to your disk. If you compare the input structure to the refined model, you should see structural improvements in the regions you selected for refinement. In case no improvements are visible, you can play around with the Rosetta density score argument to force Rosetta only to produce models that have a high density score. Be careful that overfitting is most likely occuring, if the score value is too high!


Table 6: Rosetta refinement command arguments
\begin{table}\centering
\begin{tabularx}{16cm}{c\vert X\vert X}
arg.& descript...
...10 & structure number to generate & \tt\$nstruct \\
\end{tabularx} \end{table}


Table 7: MDFF command arguments
\begin{table}\centering
\begin{tabularx}{16cm}{c\vert X\vert X}
arg.& descript...
...best $N$\ structures to run in MDFF & \tt\$bestN \\
\end{tabularx} \end{table}


Structure check

There is a yeast Rpn11 model available that is derived from a high resolution $3.5~\AA$ EM density (PDB 3jck, EMDB 6479). To check your built model, we will transition our model to the high-resolution EM density. First, we need to do a rigid body docking to the Rpn11 density from the high-resolution density. Then, we will perform an interactive MDFF run to further refine the model.
Create a new folder structure_comparison. Furthermore, create the folder dock_density in it.
1
Installing the Situs package
Go to the Situs website (http://situs.biomachina.org) and follow the download and installation instructions. Add the binary folder to your $PATH environment variable.

2
Downloading the Rpn11 model from PDB 3jck
Type the following commands in VMD to obtain the Rpn11 model from PDB 3jck:

mol new 3jck
[atomselect top "chain G"] writepdb rpn11_yeast_3jck.pdb

3
Extracting the Rpn11 density
Copy the script crop_density.tcl from 3.3.structure_comparison and the density file emdb_6479.mrc to your directory. Set the packagePath variable to the location of the ModelMaker plugin files. Run the crop_density.tcl script in VMD text mode to yield the density of Rpn11 in EMDB 6479 rpn11_yeast_3jck_2_6479_density.mrc.

4
Rigid body docking to the Rpn11 density
Copy the refined Rpn11 yeast model from the last refinement step to the previously created dock_density folder and name it rpn11_yeast_midres.pdb. As well, copy the rpn11_yeast_3jck_2_6479_density.mrc density file to this folder and navigate to it. Run the following command in the terminal:

colores rpn11_yeast_3jck_2_6479_density.mrc rpn11_yeast_midres.pdb -res 3.9 -nprocs $\langle$cores$\rangle$

Adjust $\langle$cores$\rangle$ to the number of cores you want to run Situs on.

Rename the output col_best_001.pdb to rpn11_yeast_midres_docked_3jck.pdb.
5
Interactive MDFF run
As the Rpn11 model from EMDB 6470 is in another conformational state than our predicted model, we need to further adapt the conformation to the density. To do so, perform an interactive MDFF run with QwikMD as explained in section 3.2. Use the previously docked PDB file rpn11_yeast_midres_docked_3jck.pdb and the cropped density file rpn11_yeast_3jck_2_6479_density.dx. You can then superimpose the yeast Rpn11 models in VMD, color them differently and compare the structures.


next up previous contents
Next: Homology model Up: Rosetta/MDFF Tutorial Previous: Modeling amino acid insertions   Contents
www.ks.uiuc.edu/Training/Tutorials