Next: Examining the Aquaporin Tetramer
Up: Aquaporin Tutorial
Previous: Residue Selection
Contents
Subsections
Investigating Structural Alignment
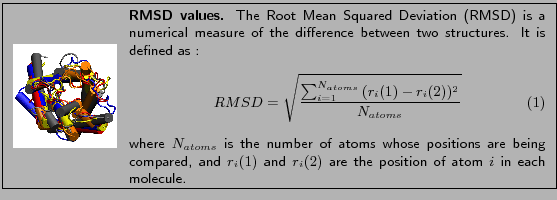
In this section you will use RMSD values between molecules as a measure
to see how close structures of molecules are after alignment.
RMSD per residue values compare two proteins and show how well they align. Here we
use RMSD values that compare solely the  atoms of the proteins.
- 1
- In the Multiseq program window choose Tools
 Plot Data.
A window entitled Data Plotting will appear on your screen. (Fig. 24)
Plot Data.
A window entitled Data Plotting will appear on your screen. (Fig. 24)
- 2
- Select the All sequences option.
- 3
- Choose the RMSD checkbox, for the Per-residue data to
plot.
Figure:
Data Plotting window.
![\begin{figure}\begin{center}
\par
\par
\latex{
\includegraphics[width=3.5 in]{pictures/rmsd-dialog}
}
\end{center}\vspace{-0.7cm}\end{figure}](img46.gif) |
- 4
- Click on the OK button to produce a plot of the RMSD values
between the first molecule in the Sequence Alignment window and any of
the aligned structures (Fig. 25). The RMSD values between each
pair of the aligned residues are shown along the sequence of the protein,
exhibiting regions of close alignment (small RMSD values) and of poor
alignment (large RMSD values).
Figure:
RMSD values between bovine AQP1 (pdb code:1j4n)
and human AQP1 (1f1y), E.Coli GlpF (1lda), and E.Coli AqpZ (1rc2)
![\begin{figure}\begin{center}
\par
\par
\latex{
\includegraphics[width=3.25 in]{pictures/rmsd-plot-new}
}
\end{center}\vspace{-0.7cm}\end{figure}](img47.gif) |
- 5
- Go back to the Multiseq program window. Compare the
RMSD graph with the sequence alignment, and identify the residues with large RMSD
values. What structural elements do they correspond to? As you will see later,
they correspond to the loops.
Figure:
Multiseq program window. Residues
corresponding to the first peak in the RMSD graph are highlighted in yellow.
![\begin{figure}\begin{center}
\par
\par
\latex{
\includegraphics[width=5 in]{pictures/first-loop}
}
\end{center}\vspace{-0.7cm}\end{figure}](img48.gif) |
- 6
- Select the residues corresponding to the first peak of the RMSD graph in the
Multiseq program window, by clicking on them.
They will be highlighted as you click on them (Fig. 26).
If you want to select residues in different regions, hold
down the shift key while selecting them.
Figure:
Highlighted residues shown in bond representation
![\begin{figure}\vspace{-0.5cm}
\begin{center}
\par
\par
\latex{
\includegraphics[width=2.5in]{pictures/loop-bond}
}
\end{center}\vspace{-1.0cm}\end{figure}](img49.gif) |
Figure:
Graphical Representations Window
![\begin{figure}\begin{center}
\par
\par
\latex{
\includegraphics[width=1.75 in]{pictures/loop-1fqy}
}
\end{center}\vspace{-0.7cm}\end{figure}](img50.gif) |
- 7
- Go back to the VMD Main window. Choose Graphics
Representations...
In the Graphical Representations window, (Fig. 28) you
should find that a new representation has been created for each molecule,
with the residues you have selected as shown in Fig. 26. Look at the representation for molecule
1fqy and compare the selection with the RMSD graph (Fig. 25)
- 8
- To proceed to the next section, close the Graphical
Representations and the RMSD per Residue windows.
Next: Examining the Aquaporin Tetramer
Up: Aquaporin Tutorial
Previous: Residue Selection
Contents
school@ks.uiuc.edu